Sunday, June 18, 2017

Installation of R on SuSE Linux

We are going to install R software package on Linux and for that we are going to use SLES11 SP3 and R 3.3.3.
A fresh install of SLES will not have any development packages and hence, it is assumed that the SDK repo has been enabled to resolve the dependencies. Java should be installed as a pre-requisite dependency package and it's installation is not covered in this tutorial. However, you can refer my previous post on "Manual Installation of Oracle Java 8". A sample screenshot of the SDK repository is shown below.


Downloads

Download the R-3.3.3 software package from here.

Dependency Downloads

Download and place the packages in /opt location or whichever location you like. It is recommended to have java pre-installed and declare the JAVA_HOME variable accordingly.

Installation

This installation assumes that you have a fresh install of the operating system. Installation of R requires many development packages which can be fetched from the SDK repositories, and a few version dependent packages like bzip2_1.0.6, pcre_8.40 and curl_7.54.1.

Installation of OS dependency packages

# zypper in gcc-c++ gcc43-c++ gcc47-c++ gcc-fortran gcc33-fortran gcc43-fortran gcc47-fortran libgfortran3 libgfortran43 libgfortran46 readline-devel xz-devel xorg-x11-devel latex2html texlive-bin-latex texlive-cjk-latex-extras texlive-latex

Installation of bzip2

Extract the downloaded tarball and move into the extracted directory.
# tar -xzvf bzip2-1.0.6.tar.gz
# cd bzip2-1.0.6/

Install
# make -f Makefile-libbz2_so
# make clean


Modify the "Makefile" in line number 18 and replace "CC=gcc" with "CC=gcc -fPIC" as shown in below screenshot.


# make
# make install PREFIX=/opt/bzip2_1.0.6

Define the binary path and load the library by making an entry in profile and /etc/ld.so.conf files.

Now bzip2 1.0.6 is installed.

Installation of pcre

Extract the downloaded tarball and move into the extracted directory.
# tar -xzvf pcre-8.40.tar.gz
# cd pcre-8.40/

Install
# ./configure --prefix=/opt/pcre_8.40 --enable-utf8
# make
# make install

Define the binary path and load the library by making an entry in profile and /etc/ld.so.conf files.

Now pcre 8.40 is installed.

Installation of curl

Extract the downloaded tarball and move into the extracted directory.
# tar -xzvf curl-7.54.1.tar.gz
# cd curl-7.54.1/

Install
# ./configure --prefix=/opt/curl_7.54.1
# make
# make install

Define the binary path and load the library by making an entry in profile and /etc/ld.so.conf files.

Now curl 7.54.1 is installed.

Installation of R

Extract the downloaded tarball and move into the extracted directory.
# tar -xzvf R-3.3.3.tar.gz
# cd R-3.3.3/

Install
# export LD_LIBRARY_PATH=/opt/curl_7.54.1/lib
# export INCLUDE=/opt/curl_7.54.1/include
# ./configure --prefix=/opt/R_3.3.3 --enable-R-shlib LDFLAGS="-L/opt/bzip2_1.0.6/lib -L/opt/pcre_8.40/lib -L/opt/curl_7.54.1/lib" CPPFLAGS="-I/opt/bzip2_1.0.6/include -I/opt/pcre_8.40/include -I/opt/curl_7.54.1/include"


# make


# make install


Define the binary path and load the library by making an entry in profile and /etc/ld.so.conf files. Below screenshot shows all the binaries exported and libraries loaded while the installation of R 3.3.3.


Verification

Test the binary and check if it is working properly.


Congrats! Now you have a working "R". 

Saturday, June 17, 2017

Cloudera Security - Kerberos Installation & Configuration

In my previous post I have demonstrated the installation of multi-node Cloudera cluster. Here I will demonstrate how to kerberize a Cloudera cluster.

Introduction to Kerberos

Kerberos is a network authentication protocol that allows both users and machines to identify themselves on a network, defining and limiting access to services that are configured by the administrator. Kerberos uses secret-key cryptography strong authentication by providing user-to-server authentication. It was built on an assumption that network connections are unreliable.

Terminology

Below are a few common terms used in Kerberos:

Principal

A user/service in Kerberos is called Principal.

A principal is made up of three distinct components:

  1. Primary (User component): The first component of principal is called the Primary. It is an arbitrary string and may be an operating system username of a user or the name of a service.
  2. Instance: Principal's first component "primary" is followed by and optional section called "instance". An instance is separated from the primary by a slash. An instance is used to create principals that are used by users in special roles or to define the host on which a service runs. Instance name is the FQDN of the host that runs that service.
  3. Realm: A realm is similar to a domain in DNS that establishes an authentication administrative domain. In other words, Kerberos realm defines a group of principals. A realm, by convention, are always written in uppercase characters.
A username can be an existing Unix account that is used by Hadoop daemons, such as hdfs or mapred or user's UNIX account. Hadoop does not support more than two-component principal names. Each service and sub-service in hadoop must have it's own principal. A principal name in given realm consists of a primary name and an instance name. In our case a principal can be in the following format, username/fully-qualified-domain-name@CDH.DEMO.

Tickets

The authentication server issues the tickets to the clients so that the client can present the ticket to the application server to demonstrate the authenticity of their identity. Each ticket has an expiry and can also be renewed. The kerberos server or KDC has no control over the issued tickets and if a user with a valid ticket can use the service until the ticket expires.

Key Distribution Center (KDC) /  Kerberos Server


The kerberos server or KDC is logically incorporated further into multiple components.
  1. Database: Contains the user's service entries like user's principal, maximum validity, maximum renewal time, password expiration, etc.
  2. Authentication server: Replies to the authentication requests sent by the clients and sends back TGT which can be used by the user without re-entering the password.
  3. Ticket Granting Server (TGS): Distributes service tickets based on TGT and validates the use of ticket for a specific purpose.

Keytab

The keytab file contains pairs of kerberos principals and an encrypted copy of that principal's key. A keytab file for a hadoop daemon is unique to each host since the principal names include hostname. This file is used to authenticate a principal on a host to kerberos without human interaction or storing a password in a plain text file. The keytab file stores long-term keys for one or more principals.

Delegation Tokens

Users in hadoop cluster authenticate themselves to the namenode using their kerberos credentials. Once the user has logged off, user credentials are passed to the namenode using delegation tokens that can be used for authentication in the future. Delegation tokens are a secret key shared with the namenode, that can be used to impersonate a user to get a job executed. Delegation tokens can be renewed. By default, the delegation tokens are only valid for a day. Jobtracker as a renewer which is allowed to renew the delegation token once a day, until the job completes, or for a maximum period of 7 days. When the job is complete, the jobtracker requests the namenode to cancel the delegation token. Delegation tokens are generally used to avoid overwhelming the KDC with authentication requests for each job.

Token format

The namenode uses a random master key to generate delegation tokens. All active tokens are stored in memory with their expiry date. Delegation tokens can either expire when the current time exceeds the expiry date, or they can be cancelled by the owner of the token. Expired or cancelled tokens are then deleted from memory.

Kerberos Working

Generally, a user supplies password to a given network server and access the network services. The transmission of authentication information for most services is however unencrypted, and hence insecure. A simple password based authentication cannot be assumed to be secure. A simple packet analyzer or packet sniffer can be used to intercept usernames and passwords compromising user accounts and cybersecurity.

Kerberos eliminates the transmission of unencrypted passwords by authenticating each user to each network service separately. Kerberos does this by using KDC to authenticate users to a suite of network services. The machines that are managed by a particular KDC constitute a realm.
  1. When a user logs into his workstation, the user authenticates to KDC by a unique identity called principal. The principal is sent to KDC for a request of TGT (Ticket-Getting Ticket). This TGT request can be sent manually by the user through kinit program after the user logs in or it can also be sent automatically by the login program.
  2. KDC then checks for the principal in it's database. If the principal is found, KDC creates a TGT, encrypts it using the user's key and sends the TGT ticket back to that user's session.
  3. The login or kinit program decrypts the TGT using the user's key (computed from user's password). User's key is used only on client machine. The tickets sent by KDC are stored locally in a file credentials cache, which can be checked by kerberos aware services. Thus, this is how kerberos aware services look for the ticket on user's machine rather than requiring the user to authenticate using password.
  4. After TGT is issued, the user does not have to re-enter the password until the TGT expires or until the user logs out.

Authentication Process in Cloudera

Hadoop authenticates using below two ways:

  1. Simple: By default, Cloudera uses the simple authentication method where the client must specify a username and password of their respective Linux user account for any activity like HDFS query or MapReduce job submission.
  2. Kerberos: Here the HTTP client uses Simple and Protected GSSAPI Negotiation Mechanism (SPNEGO) for authentication purpose.


Using kerberos, if the namenode finds that the token already exists in memory, and that the current time is less than the expiry date of the token, then the token is considered valid. If valid, the client and the namenode will then authenticate each other by using the TokenAuthenticator that they posses as the secret key, and MD5 as the protocol. Since the client and namenode do not actually exchange TokenAuthenticators during the process, even if authentication fails, the tokens are not compromised.

Token Renewal Process

TGT renewal process is very important feature, due to which the long running jobs might actually take advantage of renewing the ticket so that they can continue running. Delegation tokens must be renewed periodically by the designated renewer.
For example, if jobtracker is designated renewer, the jobtracker will first authenticate itself to namenode. It will then send the token to be authenticated to the namenode. The namenode verifies the following information before renewing the token:
  1. The jobtracker requesting renewal is the same as the one identified in the token by renewerID.
  2. The TokenAuthenticator generated by the namenode using the TokenID and the masterKey matches the one previously stored by the namenode.
  3. The current time must be less than the time specified by maxDate.

Requirements

  1. All cluster hosts should have network access to KDC.
  2. Kerberos client utilities should be installed on every cluster host.
  3. Java Cryptography Extensions should be setup on all Cloudera Manager hosts in the cluster.
  4. All hosts are required to be configured in NTP for time synchronization.

KDC Server Installation

A KDC server can be a completely separate machine or can be a machine where Cloudera Manager is already running. The below mentioned procedure installs kerberos on a working cluster.

JCE Installation

Location

First thing we need to do is install Java Cryptography Extension (JCE) Unlimited Strength Jurisdiction Policy Files. Download the Java 8 JCE files from here. In case you are not sure of your java version, use the below command to find out your java version
# java -version

Next find the default location of local policy file.
# locate local_policy.jar

Unzip the downloaded policy file
# unzip jce_policy-8.zip

Copy the policy files to the default location.
# cd UnlimitedJCEPolicyJDK8
# cp local_policy.jar /opt/jdk1.8.0_121/jre/lib/security
# cp US_export_policy.jar /opt/jdk1.8.0_121/jre/lib/security

Package Installation

Different packages are required for both the server and client nodes.

Location: Server (nn.cdh.demo)

# yum -y install krb5-server krb5-libs krb5-auth-dialog krb5-workstation

Location: Client (nn.cdh.demo/dn1.cdh.demo/dn2.cdh.demo)

# yum -y install krb5-workstation krb5-libs krb5-auth-dialog

Server Configuration

Location: Server (nn.cdh.demo)

The kdc.conf file can be used to control the listening ports of the KDC and kadmind, as well as realm-specific defaults, the database type and location, and logging.

Configure the server by changing the realm name and adding some kerberos related parameters.
Realm Name: CDH.DEMO
Parameters: max_life = 1d
                    max_renewable_life = 7d

Note: All realm names are in uppercase whereas DNS hostnames and domain names are lowercase.

# vi /var/kerberos/krb5kdc/kdc.conf
[kdcdefaults]
 kdc_ports = 88
 kdc_tcp_ports = 88

[realms]
 CDH.DEMO = {
  #master_key_type = aes256-cts
  acl_file = /var/kerberos/krb5kdc/kadm5.acl
  dict_file = /usr/share/dict/words
  admin_keytab = /var/kerberos/krb5kdc/kadm5.keytab
  supported_enctypes = aes256-cts:normal aes128-cts:normal des3-hmac-sha1:normal arcfour-hmac:normal des-hmac-sha1:normal des-cbc-md5:normal des-cbc-crc:normal
  max_life = 1d
  max_renewable_life = 7d
 }

Client Configuration

If you are not using DNS TXT records, you must specify the default_realm in [libdefaults] section. If you are not using DNS SRV records, you must include the kdc tag for each realm in the [realms] section. To communicate witht the kadmin server in each realm, the admin_server tag must be set in the [realms] section.

Set the realm name and domain-to-realm mapping in the below mentioned file.

Location: Clients (nn.cdh.demo/dn1.cdh.demo/dn2.cdh.demo)

# vi /etc/krb5.conf
[logging]
default = FILE:/var/log/krb5libs.log
kdc = FILE:/var/log/krb5kdc.log
admin_server = FILE:/var/log/kadmind.log

[libdefaults]
default_realm = CDH.DEMO
dns_lookup_realm = false
dns_lookup_kdc = false
ticket_lifetime = 24h
renew_lifetime = 7d
forwardable = true

[realms]
CDH.DEMO = {
kdc = nn.cdh.demo
admin_server = nn.cdh.demo
udp_preference_limit = 1
default_tgs_enctypes = des-hmac-sha1
}

[domain_realm]
.cdh.demo = CDH.DEMO
cdh.demo = CDH.DEMO

Initialize Kerberos Database

Create the database which stores the keys for the kerberos realm. The -s option creates a stash file to store master password. Without this file KDC will prompt the user for the master password everytime it starts after a reboot.

Location: Server (nn.cdh.demo)

# /usr/bin/kdb5_util create -s
Loading random data
Initializing database '/var/kerberos/krb5kdc/principal' for realm 'CDH.DEMO',
master key name 'K/M@CDH.DEMO'
You will be prompted for the database Master Password.
It is important that you NOT FORGET this password.
Enter KDC database master key:
Re-enter KDC database master key to verify:

The above command will create following files in "/var/kerberos/krb5kdc" path.
  • two kerberos database files, principal, and principal.ok
  • the kerberos administrative database file, principal.kadm5
  • the administrative database lock file, principal.kadm5.lock

Adding Administrator for Kerberos Database

First create the principal "admin" which has administrator privileges using kadmin utility. This principal has to match the expression that you have specified in /var/kerberos/krb5kdc/kadm5.acl file. Also create "cloudera-scm" principal that will be used by Cloudera Manager to manage hadoop principals. The kadmin command is specifically used on the same host as KDC and does not use kerberos for authentication. We can create this principal with kadmin.local.

Location: Server (nn.cdh.demo)

# kadmin.local -q "addprinc admin/admin@CDH.DEMO"
# kadmin.local -q "addprinc cloudera-scm/admin@CDH.DEMO"

Note: To enable only "kadmin" command to add principals, we need to add principal root/admin@CDH.DEMO. Whereas "kadmin.local" will work normally.

Specifying Principals with Administrative Access

We need to create ACL file and put kerberos principal of atleast one of the administrators into it. This file is used by kadmin daemon to control which principal may view and make modifications to the kerberos database files.
Adding to Access Control Lists gives privilege to add principals for admin and cloudera-scm principal.

Location: Server (nn.cdh.demo)

# vi /var/kerberos/krb5kdc/kadm5.acl
*/admin@CDH.DEMO         *
admin/admin@CDH.DEMO         *
cloudera-scm/admin@CDH.DEMO          *

Start Kerberos Daemons

Start kerberos KDC and administrative daemons
# service krb5kdc start
# chkconfig krb5kdc on
# service kadmin start
# chkconfig kadmin on

Verifying & Testing Kerberos

If a user is unable to access the cluster using "hadoop fs -ls /" command, and produces the below error, actually means that the Kerberos is functioning properly.


A user must be a kerberos user to perform hadoop tasks like listing files or submitting jobs. A normal user can no longer execute hadoop commands and perform hadoop tasks without seeing the above error, until his/her user is authenticated using kerberos.

Create UNIX user
# useradd user1
# passwd user1

Create a user principal in kerberos
# kadmin.local
kadmin.local: addprinc user1

Request a ticket
# kinit user1

Or, login as user1 and request for a ticket by issuing kinit command without specifying username as "user1".
# su - user1
$ kinit

Diplay the ticket and encryption type information
# klist -e


The above screenshot shows that user1 has received TGT from KDC and the ticket is valid for only 1 day.

Managing Principals

First run kinit to obtain a ticket and let it store in credential cache file. Then use klist command to view the list of credentials in the cache. To destroy the cache and it's credentials use kdestroy.

Specifying queries with/without entering the kadmin console.

List principals
# kadmin.local admin/admin -q "list_principals"
kadmin.local: list_principals

Add new principal
# kadmin.local -q "addprinc user1"
kadmin.local: addprinc user1

Delete principal
# kadmin.local -q "delprinc user1"
kadmin.local: delprinc user1

Delete KDC database
# kdb5_util -f -r CDH.DEMO destroy

Backup KDC database
# kdb5_util dump kdcfile

Restore KDC database
# kdb5_util load kdcfile

Display ticket and encryption type
# klist -e

Exit kadmin utility
kadmin.local: quit

Kerberos Security Wizard

Once all hosts are configured with kerberos, configure kerberos for Cloudera Manager. The following steps need to be performed from Cloudera Manager Admin Console. The Cloudera Manager Admin Console can be accessed from a browser by typing the following URL, http://<cloudera-manager-server-IP>:7180. In our case it can be accessed by typing the URL - http://192.168.56.101:7180.

Click on "Administration" tab and then click on "Security" from the drop-down menu.


Configure kerberos by clicking on "Enable Kerberos".


Make sure the KDC is setup, openLDAP client libraries shoud be installed and cloudera-scm principal is created as specified in below screenshot.


Once all dependencies have been resolved, select all and click on "Continue".


Specify the necessary KDC server details required to configure kerberos like KDC server host, realm name and various encryption types, etc.


Configure krb5 as shown in below screenshot.


Specify the account to manager other users' principals.


Specify the principals that will be used by services like HDFS, yarn and zookeeper.


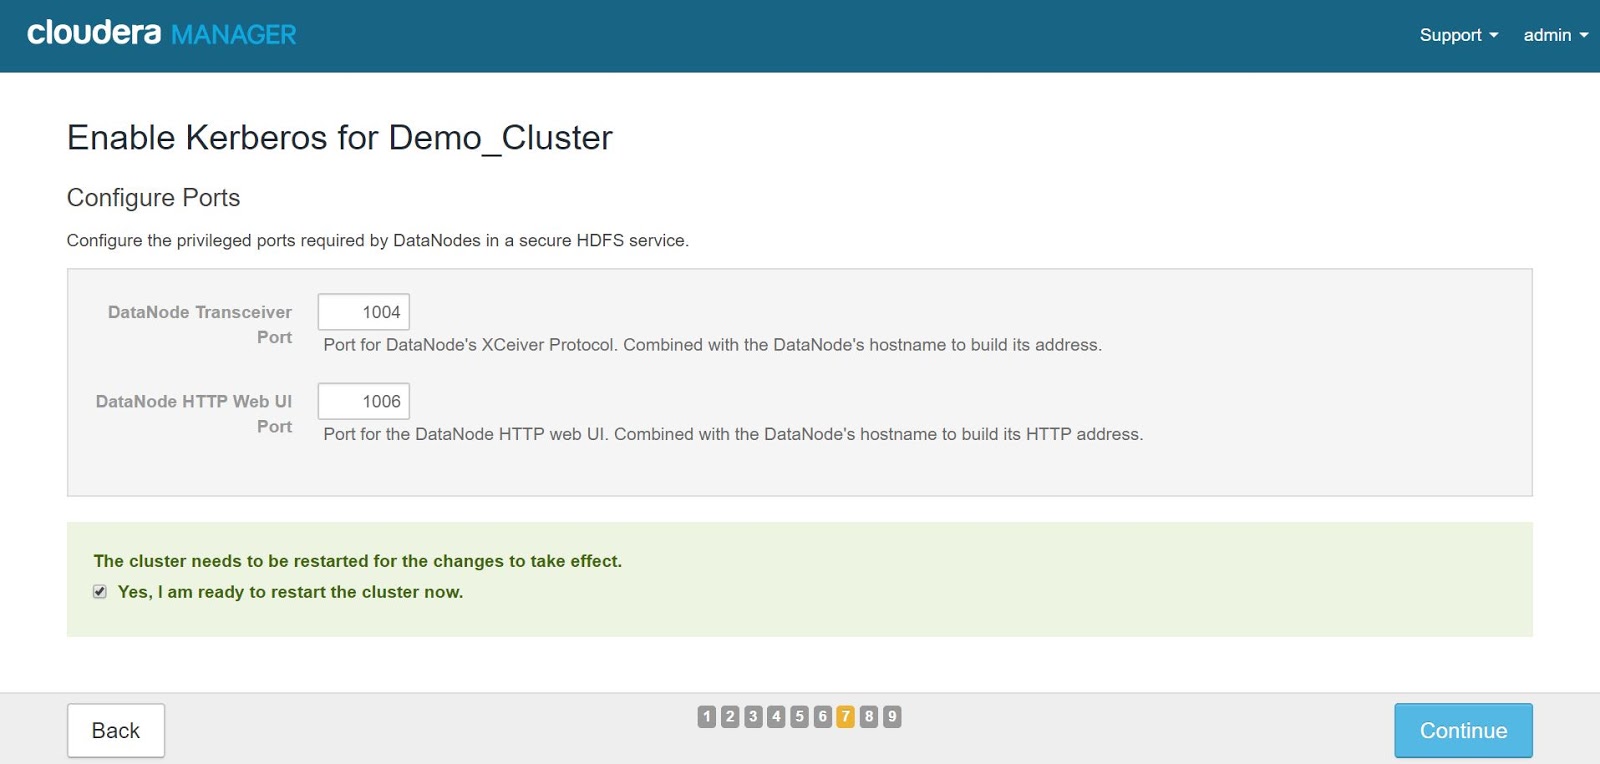
 Configure the privileged ports required by datanodes in a secure HDFS service.


Finally the cluster is kerberized.


References:

  • https://blog.godatadriven.com/kerberos-cloudera-setup.html
  • http://blog.puneethabm.in/configure-hadoop-security-with-cloudera-manager-using-kerberos/


Related Posts:
Cloudera Multi-Node Cluster Installation

TAGScdh 5.9.1cmcdh 5.9.1 securitycdh 5.9.1 security implementationcloudera hadoop kerberos, kerberoscloudera hadoop cdh 5.9.1 securityhadoop multinode cluster kerberosinstall and configure kerberos on cloudera hadoopinstall kerberos cdh 5.9.1install kerberos on cloudera hadoop multinode clusterinstall kerberos on cloudera hadooplatest cloudera hadoopkerberos on multinode hadoop cluster installation

Monday, May 01, 2017

Cloudera Multi-Node Cluster Installation

Here we are going to setup a multi-node fully distributed Cloudera Hadoop cluster configured with "MySQL" as external database. We will also configure our cluster to authenticate using Kerberos and authorize using OpenLDAP as additional security implementations.


ENVIRONMENT SETUP & CONFIGURATION

Operating System: CentOS-6.8
Cloudera Manager Version: 5.9.1
CDH Version: 5.9.1

We will create three virtual machines as namenode, datanode1 and datanode2 respectively using VirtualBox. Cloning of virtual machines can also be performed in order to save time. Below is the required overall configuration of virtual machines.


VM1
VM2
VM3
Role
Namenode
Datanode1
Datanode2
Hostname
nn.cdh.demo
dn1.cdh.demo
dn2.cdh.demo
Memory
6G
3G
3G
Disk
60G
60G
60G
No of network interfaces
02
01
01
Adapter1 (Private)
Host-Only
Host-Only
Host-Only
Adapter2 (Public)
NAT
None
None
IP Address (Private)
192.168.56.101
192.168.56.111
192.168.56.112
IP Address (Public)
DHCP
DHCP
DHCP


Note: Internet connectivity is required for namenode and the above mentioned configuration serves the purpose for our setup.


i) Operating System Configuration

OS Partitioning
We are following the below partition table for our lab setup and this is not the recommended partitioning scheme to be followed in standard installation environments. The partition table layout varies upon the requirement.

OS Local Repository Configuration
Location: Namenode (nn.cdh.demo)

Starting the HTTP service and persisting it across reboots.
# service httpd start
# chkconfig httpd on

Mount the CentOS-6.8 ISO image in the namenode.


Create a directory in "/var/www/html" directory
# mkdir /var/www/html/CentOS-6.8

Copy the contents of the DVD to "/var/www/html" directory
# rsync -arvp --progress /media/CentOS_6.8_Final/* /var/www/html/CentOS-6.8/

Location: All nodes
Creating the repo file
# vi /etc/yum.repos.d/centos68local.repo
[CentOS-6.8_LocalRepository]
name=CentOS-6.8_LocalRepo
baseurl=http://192.168.56.101/CentOS-6.8
enabled=1
gpgcheck=0

Location: All nodes
Move the previous OS repo files to a backup location
# mkdir /etc/yum.repos.d/repobkp
# mv /etc/yum.repos.d/CentOS-* /etc/yum.repos.d/repobkp

Verification
# yum repolist


Open a browser on any node and check that httpd server is working for CentOS-6.8 local repository.


Dependency Installation
Location: All nodes

The following dependencies need to be installed before we proceed further. The following packages are installed based upon our requirement for the installation of CDH. It is not a standard practice to install the same packages and it may vary according to the individual or customer requirement.
# yum install openssh* openssl* httpd elinks epel-release pssh createrepo wget ntp ntpdate ntp-doc yum-utils mod_ssl
# yum groupinstall "Development Tools"
# yum update -y

Disabling Firewall
Location: All nodes

It is recommended to disable firewall. Run the below command to start setup utility.

# setup


# service iptables stop
# service ip6tables stop
# chkconfig iptables off
# chkconfig ip6tables off

Disabling Network Manager
# service NetworkManager stop
# chkconfig NetworkManager off

Disabling Selinux
Location: All nodes

It is recommended to disable SElinux
# vi /etc/sysconfig/selinux

Configuring File Descriptor & ulimits
Location: All nodes

The recommended value of open file descriptors is "10000" or more. If the values are not greater than or equal to 10000, run the below to set the value to "10000".

Verifying the ulimit values.
# ulimit -Sn
# ulimit -Hn

Configuring the ulimit value.
# ulimit -n 10000

Configuring hosts file
Location: All nodes

The /etc/hosts file should be edited in below format.
<ip-address>  <FQDN>  <Short Name>

A sample /etc/hosts file is shown below.
# vi /etc/hosts
127.0.0.1   localhost localhost.localdomain localhost4 localhost4.localdomain4
::1         localhost localhost.localdomain localhost6 localhost6.localdomain6
192.168.56.101  nn.cdh.demo     nn
192.168.56.102  dn1.cdh.demo    dn1
192.168.56.103  dn2.cdh.demo    dn2

NTP Configuration
Location: All nodes

The clocks on all the nodes in the cluster must synchronize with each other for time synchronization across the cluster.
# service ntpd start
# chkconfig ntpd on
# ntpdate pool.ntp.org

Set the date using below example.
# date -s "01 MAY 2017 00:20:00"
# hwclock -w
# hwclock -r
# date

SSH Configuration (Optional)
Location: Namenode (nn.cdh.demo)

Everytime we login to a server, it asks for permission to login to the new host. To avoid answering "yes/no", we can modify "StrictHostKeyChecking" parameter value to "no" in ssh_config file as shown below.
# vi /etc/ssh/ssh_config
StrictHostKeyChecking no

OS Kernel Tuning
Location: All nodes

Disable Host Swappiness
This linux parameter controls how aggressively memory pages are swapped to disk. The value can be between 0-100. The higher the value, the more aggressive is kernel in swapping out inactive memory pages to disk which can lead to issues like lengthy garbage collection pauses for important system daemons because swap space is much slower than memory as it is backed by disk instead of RAM. Cloudera recommends setting this parameter to "0", but it has been found that in recent kernels setting this to "0" causes out-of-memory issues
(Ref: Link)

To change the swappiness value to "10" edit the "sysctl.conf" file as mentioned below.
# vi /etc/sysctl.conf
vm.swappiness=10

Disable Transparent Huge Pages Compaction
THP is known to cause 30% CPU overhead and can seriously degrade system performance. It is recommended by both Cloudera and Hortonworks to disable THP to reduce the amount of system CPU utilization  on the worker nodes.
(Ref: Link1/Link2)

Run the below mentioned command to disable transparent huge pages.
# vi /etc/rc.local
# vi /etc/rc.local
if
test -f /sys/kernel/mm/transparent_hugepage/enabled; then echo never > /sys/kernel/mm/redhat_transparent_hugepage/enabled
fi

if
test -f /sys/kernel/mm/transparent_hugepage/defrag; then echo never > /sys/kernel/mm/redhat_transparent_hugepage/defrag
fi

Verification of defined kernel specific parameters
# sysctl -p | grep vm.swappiness
# cat /sys/kernel/mm/transparent_hugepage/defrag

Improve Virtual Memory Usage
The vm.dirty_background_ratio and vm.dirty_ratio parameters control the percentage of system memory that can be filled with memory pages that still need to be written to disk. Ratios too small force frequent IO operations, and too large leave too much data stored in volatile memory, so optimizing this ration is a careful balance between optimizing IO operations and reducing risk of data loss.

# vi /etc/sysctl.conf
vm.dirty_background_ratio=20
vm.dirty_ratio=50

Configure CPU Performance Scaling
CPU Scaling is configurable and defaults commonly to favor power saving over performance. For Hadoop clusters, it is important that we configure then for better performance over other options.
# cpufreq-set -r -g performance
Or
# vi /sys/devices/system/cpu/cpu*/cpufreq/scaling_governor
performance

ii) Installing VirtualBox Guest Additions

Location: All nodes

The VirtualBox Guest Additions consist of device drivers and system applications that optimize the operating system for better performance and usability. Proceeding without installing VirtualBox Guest Additions is safe and does not hamper our proceedings but still we recommend to do so for convenient usage purpose of the user.
# cd /media/VBOXADDITIONS_5.1.14_112924/
# ./VBoxLinuxAdditions.run

iii) VM Cloning

Note down the MAC address
# vi /etc/sysconfig/network
# vi /etc/sysconfig/hosts
# vi /etc/sysconfig/network-scripts/ifcfg-eth0
Change ip and comment UUID & HWADDR
# vi /etc/udev/rules.d/70-persistent-net.rules
Comment the old MAC addresses and rename the interface names to eth0 & eth1

If the machines are not cloned and installed separately, it might be tedious work copying files and configuring parameters on each and every machine exclusively. Though we can use a for loop for the same, but the parallel shell comes handy with the operating system and can be used for the purpose conveniently as an alternate.

Example:
# pscp.pssh -h hosts -l root /etc/hosts /etc
# pssh -h hosts -i -l root hostname

iv) Passwordless-SSH Configuration

Location: Namenode (nn.cdh.demo)

After the cloning of virtual machines, we need to setup a passwordless-SSH environment exclusively for "root" user on the namenode. Configuring passwordless-SSH environment is a mandatory requirement of namenode to start various hadoop daemons across the cluster. Run the below mentioned commands to setup passwordless-SSH.

Generate SSH key for root user
# ssh-keygen -t rsa
Generating public/private rsa key pair.
Enter file in which to save the key (/root/.ssh/id_rsa):
Enter passphrase (empty for no passphrase):
Enter same passphrase again:
Your identification has been saved in /root/.ssh/id_rsa.
Your public key has been saved in /root/.ssh/id_rsa.pub.
The key fingerprint is:
45:9e:72:ac:72:f8:57:44:c1:bc:8e:42:c9:64:97:19 root@cdh1.demo.lab
The key's randomart image is:
+--[ RSA 2048]----+
|          E*o.   |
|        o++oo    |
|       +.o* ..   |
|       .+= ..    |
|      o.S  o.    |
|       +. ...    |
|        ...      |
|         .       |
|                 |
+-----------------+
#

Copy the SSH key to all other nodes
# ssh-copy-id -i /root/.ssh/id_rsa.pub root@dn1.cdh.demo
# ssh-copy-id -i /root/.ssh/id_rsa.pub root@dn2.cdh.demo

Self passwordless-SSH for namenode
# ssh-copy-id -i /root/.ssh/id_rsa.pub root@nn.cdh.demo

Testing Passwordless-SSH Environment
Try logging into the datanodes from namenode machine. Also check the self passwordless-SSH into namenode. All the listed below commands should login into the respective machines without asking for a password.
[root@nn1 ~]# ssh nn1
[root@nn1 ~]# ssh dn1
[root@nn1 ~]# ssh dn2

v) Java Installation Using Alternatives

Location: All nodes

Check the java prerequisites for your cdh version from this link. Currently our version supports minimum version Oracle JDK1.8_31 and Oracle JDK1.7_55. The excluded versions are Oracle JDK1.8_40/JDK1.8_45. Cloudera Manager can self install Oracle JDK1.7_67 during installation and upgrade.

Download java from the this link and place the java tarball in /opt directory.
# cd /opt
# tar -xzvf jdk-8u121-linux-x64.tar.gz
alternatives --install /usr/bin/java java /opt/jdk1.8.0_121/bin/java 300000

Select the latest installed java version as default java using below command.
# alternatives --config java


Setting paths
# vi /etc/profile.d/oracle_jdk1.8.0_121.sh
#!/bin/bash
export JAVA_HOME=/opt/jdk1.8.0_121/
export PATH=$PATH:$JAVA_HOME/bin

Execute the java profile
# source /etc/profile

# echo $JAVA_HOME
/opt/jdk1.8.0_121/

Verifying Java Installation
Run the commands mentioned in the screenshot to identify the Java version.


vi) Identifying Python Installation

A minimum version of Python 2.4 is required by cloudera manager. But many other components of Hadoop are dependent upon Python 2.6. Currently the cloudera manager does not support Python 3.0 and higher.

Issue the command listed in the below screenshot to verify the python version.


INSTALLATION & CONFIGURATION OF MYSQL DATABASE


Location: Namenode (nn.cdh.demo)

i) Installation Using Internet based YUM

Cloudera Manager & other big data components like HIVE, OOZIE & HUE, all require SQL based datastore to store their metadata. For production cluster it is recommended to use external database instead of embedded database. For database version and compatibility matrix you need to check Cloudera official version specific documents. It is also recommended to have one DB instance per cluster, but in production if you have HA configured for your DB instances you can use that DB for multiple cluster setups. Requirement varies based on scenario.

If OS default MySQL is not supported then download required version of MySQL rpm bundle from here. Whereas you can also install MySQL server packages via YUM or RPM.

Before going forth, check the version of MySQL that is supported by CDH 5.9.1. Click here to find the compatible version. The compatible versions of MySQL that are supported by CDH 5.9.1 are 5.7/5.6/5.5/5.1. By default MySQL 5.1 comes from the operatin system repository. Below is the Cloudera supported database matrix for further information.


Download the relevant YUM repository rpm for CentOS 6.8 from this link or alternatively using wget command as mentioned below.
# wget -c https://dev.mysql.com/get/mysql57-community-release-el6-9.noarch.rpm

Install the repository rpm
# rpm -ivh mysql57-community-release-el6-9.noarch.rpm

Now we have to make sure that the MySQL 5.6 repository is properly configured.
Edit the "mysql-community.repo" file in /etc/yum.repos.d/ location. Ensure that "MySQL Connectors Community", "MySQL Tools Community" & "MySQL 5.6 Community Server" repositories are only enabled and rest all are disabled.  Below shown is a sample file for reference.

# cat /etc/yum.repos.d/mysql-community.repo
[mysql-connectors-community]
name=MySQL Connectors Community
baseurl=http://repo.mysql.com/yum/mysql-connectors-community/el/6/$basearch/
enabled=1
gpgcheck=1
gpgkey=file:///etc/pki/rpm-gpg/RPM-GPG-KEY-mysql

[mysql-tools-community]
name=MySQL Tools Community
baseurl=http://repo.mysql.com/yum/mysql-tools-community/el/6/$basearch/
enabled=1
gpgcheck=1
gpgkey=file:///etc/pki/rpm-gpg/RPM-GPG-KEY-mysql

# Enable to use MySQL 5.5
[mysql55-community]
name=MySQL 5.5 Community Server
baseurl=http://repo.mysql.com/yum/mysql-5.5-community/el/6/$basearch/
enabled=0
gpgcheck=1
gpgkey=file:///etc/pki/rpm-gpg/RPM-GPG-KEY-mysql

# Enable to use MySQL 5.6
[mysql56-community]
name=MySQL 5.6 Community Server
baseurl=http://repo.mysql.com/yum/mysql-5.6-community/el/6/$basearch/
enabled=1
gpgcheck=1
gpgkey=file:///etc/pki/rpm-gpg/RPM-GPG-KEY-mysql

[mysql57-community]
name=MySQL 5.7 Community Server
baseurl=http://repo.mysql.com/yum/mysql-5.7-community/el/6/$basearch/
enabled=0
gpgcheck=1
gpgkey=file:///etc/pki/rpm-gpg/RPM-GPG-KEY-mysql

[mysql80-community]
name=MySQL 8.0 Community Server
baseurl=http://repo.mysql.com/yum/mysql-8.0-community/el/6/$basearch/
enabled=0
gpgcheck=1
gpgkey=file:///etc/pki/rpm-gpg/RPM-GPG-KEY-mysql

[mysql-tools-preview]
name=MySQL Tools Preview
baseurl=http://repo.mysql.com/yum/mysql-tools-preview/el/6/$basearch/
enabled=0
gpgcheck=1
gpgkey=file:/etc/pki/rpm-gpg/RPM-GPG-KEY-mysql

The YUM repository is now updated and should show the MySQL 5.6 repository.
# yum repolist


# yum install mysql-community-server
# service mysqld start
# chkconfig mysqld on

ii) Configuration of MySQL Database

Next we will configure MySQL as an external database for our setup.

The below command output is trucated intentionally.
# mysql_secure_installation
Enter current password for root (enter for none):
Set root password? [Y/n] y
New password:
Re-enter new password:
Password updated successfully!
Reloading privilege tables..
 ... Success!
Remove anonymous users? [Y/n] y
 ... Success!
Disallow root login remotely? [Y/n] n
Remove test database and access to it? [Y/n] y
Reload privilege tables now? [Y/n] y
 ... Success!
All done!  If you've completed all of the above steps, your MySQL
installation should now be secure.
Thanks for using MySQL!
Cleaning up…

Login into the MySQL database and create a test database.
# mysql -u root -p
mysql> create database test DEFAULT CHARACTER SET utf8;
mysql> grant all on test.* TO 'test'@'%' IDENTIFIED BY 'test';

Creating Database for Activity Monitor
Database Name: amon
Username: amon
Password: amon

mysql> create database amon DEFAULT CHARACTER SET utf8;
mysql> grant all on amon.* TO 'amon'@'%' IDENTIFIED BY 'amon';

Creating Database for Reports Manager
Database Name: rman
Username: rman
Password: rman

mysql> create database rman DEFAULT CHARACTER SET utf8;
mysql> grant all on rman.* TO 'rman'@'%' IDENTIFIED BY 'rman';

Creating Database for Hive Metastore Server
Database Name: metastore
Username: hive
Password: hive

mysql> create database metastore DEFAULT CHARACTER SET utf8;
mysql> grant all on metastore.* TO 'hive'@'%' IDENTIFIED BY 'hive';

Creating Database for Sentry Server
Database Name: sentry
Username: sentry
Password: sentry

mysql> create database sentry DEFAULT CHARACTER SET utf8;
mysql> grant all on sentry.* TO 'sentry'@'%' IDENTIFIED BY 'sentry';

Creating Database for Cloudera Navigator Audit Server
Database Name: nav
Username: nav
Password: nav

mysql> create database nav DEFAULT CHARACTER SET utf8;
mysql> grant all on nav.* TO 'nav'@'%' IDENTIFIED BY 'nav';

Creating Database for Cloudera Navigator Metadata Server
Database Name: navms
Username: navms
Password: navms

mysql> create database navms DEFAULT CHARACTER SET utf8;
mysql> grant all on navms.* TO 'navms'@'%' IDENTIFIED BY 'navms';

Creating Database for Oozie
Database Name: oozie
Username: oozie
Password: oozie

mysql> create database oozie;
mysql> grant all privileges on oozie.* to 'oozie'@'nn.cdh.demo' identified by 'oozie';
mysql> grant all privileges on oozie.* to 'oozie'@'%' identified by 'oozie';

Creating Database for Hue
Database Name: hue
Username: hue
Password: hue

mysql> create database hue;
mysql> grant all privileges on hue.* to 'hue'@'nn.cdh.demo' identified by 'hue';

Verification
Run the below commands to verify the MySQL 5.6 installation.

Login into MySQL shell
# mysql -u root -p

mysql> show tables;
mysql> show databases;

iii) Installation of MySQL JDBC Driver

Location: Namenode (nn.cdh.demo)

The MySQL JDBC driver needs to be installed on all nodes. The MySQL 5.6 requires driver version 5.1.26 or higher. Hence, we shall install driver version 5.1.40.

Download the driver from this link. Alternatively we can download the driver directly using the below wget command.
# wget -c https://dev.mysql.com/get/Downloads/Connector-J/mysql-connector-java-5.1.40.tar.gz
# tar -xzvf mysql-connector-java-5.1.40.tar.gz
# cd mysql-connector-java-5.1.40
# ln -s mysql-connector-java-5.1.40-bin.jar /usr/share/java/mysql-connector-java.jar

CLOUDERA INSTALLATION


Cloudera Manager can be installed using both local yum repository as well as internet based repositories. We will install using local repository.

i) Cloudera Manager Local YUM Repository Configuration

Location: Namenode (nn.cdh.demo)

Generally a local yum repository is configured to save both bandwidth and time.

Create a directory in "/var/www/html" location and download the rpms.
# mkdir -p /var/www/html/CDH591/cm/5.9.1
# cd /var/www/html/CDH591/cm/5.9.1

Download the rpms for Cloudera Manager 5.9.1 using the below commands.
# wget -c http://archive.cloudera.com/cm5/redhat/6/x86_64/cm/5.9.1/RPMS/x86_64/cloudera-manager-agent-5.9.1-1.cm591.p0.8.el6.x86_64.rpm

# wget -c http://archive.cloudera.com/cm5/redhat/6/x86_64/cm/5.9.1/RPMS/x86_64/cloudera-manager-daemons-5.9.1-1.cm591.p0.8.el6.x86_64.rpm

# wget -c http://archive.cloudera.com/cm5/redhat/6/x86_64/cm/5.9.1/RPMS/x86_64/cloudera-manager-server-5.9.1-1.cm591.p0.8.el6.x86_64.rpm

# wget -c http://archive.cloudera.com/cm5/redhat/6/x86_64/cm/5.9.1/RPMS/x86_64/cloudera-manager-server-db-2-5.9.1-1.cm591.p0.8.el6.x86_64.rpm

# wget -c http://archive.cloudera.com/cm5/redhat/6/x86_64/cm/5.9.1/RPMS/x86_64/enterprise-debuginfo-5.9.1-1.cm591.p0.8.el6.x86_64.rpm
# wget -c http://archive.cloudera.com/cm5/redhat/6/x86_64/cm/5.9.1/RPMS/x86_64/jdk-6u31-linux-amd64.rpm
# wget -c http://archive.cloudera.com/cm5/redhat/6/x86_64/cm/5.9.1/RPMS/x86_64/oracle-j2sdk1.7-1.7.0+update67-1.x86_64.rpm
# wget -c http://archive.cloudera.com/cm5/redhat/6/x86_64/cm/RPM-GPG-KEY-cloudera
# createrepo .

Open a browser and check that httpd server is working for Cloudera Manager 5.9.1 local repository.


Location: All nodes


Create repo file on all nodes that will be used for Cloudera Manager daemons installation.

# vi /etc/yum.repos.d/cm591.repo
[CM-5.9.1_LocalRepository]
name=CM-5.9.1_LocalRepo
baseurl=http://192.168.56.101/CDH591/cm/5.9.1
enabled=1
gpgcheck=0

Repository Verification
# yum repolist


Preparing Parcels Repository for later use
Location: Namenode (nn.cdh.demo)

# mkdir /var/www/html/cloudera591/parcels
# cd /var/www/html/cloudera591/parcels
# wget -c http://archive.cloudera.com/cdh5/parcels/5.9.1.4/CDH-5.9.1-1.cdh5.9.1.p0.4-el6.parcel
# wget -c http://archive.cloudera.com/cdh5/parcels/5.9.1.4/CDH-5.9.1-1.cdh5.9.1.p0.4-el6.parcel.sha1
# wget -c http://archive.cloudera.com/cdh5/parcels/5.9.1.4/manifest.json

Open a browser and verify the http server working
http://192.168.56.101/CDH591/parcel

ii) Cloudera Manager 5.9.1 Installation

We will begin installing Cloudera Manager version 5.9.1.
Location: Namenode (nn.cdh.demo)

# cd /var/www/html/CDH591/cm/5.9.1
# yum install cloudera-manager-server


iii) Cloudera Manager Configuration


Create SCM Database in MySQL Database

Location: Namenode (nn.cdh.demo)


# /usr/share/cmf/schema/scm_prepare_database.sh mysql -h nn.cdh.demo -u root -p --scm-host nn.cdh.demo scm scm scm


(Note: Skipping this step throws "cloudera-scm-server dead but pid file exists" error)

Starting Cloudera Manager Server Daemon
# service cloudera-scm-server start

Verification
Once the Cloudera scm server daemon has started, you will notice the 7180 port running. Run the below command to verify.
# netstat -ntulp | grep 7180


iv) CDH 5.9.1 Installation


Finally, point your browser to the below mentioned address
http://192.168.56.101:7180


Enter the login credentials as mentioned below.
Username: admin
Password: admin

Click on "Continue" tab.


Select "Cloudera Enterprise Data Hub Edition Trial" and click on "Continue".


Click on "Continue".


Specify the hosts and click on "Search".


After the namenode and datanodes are detected, select all nodes and click on "Continue".


We will install CDH using local parcel repository.


Click on "More Options" to configure parcel repository paths are related settings. Click "Save Changes" and click on "Continue".


If you still haven't installed Oracle JDK, the installation wizard will automatically install it in all nodes. Since, we have already installed the latest version of Oracle JDK we will click on "Continue". It is always recommended to install the latest Oracle JDK prior to installing CDH.


We can configure CDH to run its various components like HDFS, HBase, Hive, etc using a single user mode. But we will go for distinct users for various CDH components. Click on "Continue" to proceed further.


The next screen asks to provide the SSH login credentials and in our case we will provide "root" user credentials. Click "Continue" to proceed.


Installation of CDH begins in this step. Check for the logs in "/var/log/".


Click "Continue" to go forth.


After the selected parcels have been successfully downloaded, distributed and activated in all nodes, click on "Continue".


Verify that there are no pending tasks on the Validations page. You can correct the errors and click on "Run Again" to recheck the validations.


Go through the versions of various Hadoop components that are going to be installed and click on "Finish".


Choose the services that you want to install. We have selected "Custom Services" where we will install only HDFS, MRv2, ZooKeeper, Oozie & Hive. We can always go for installation of additional components as per requirement. Click on "Continue".


Customize the roles for each node as per your requirement and click on "Continue".


Setup the databases for the respective Hadoop components.


Review the configuration and click on "Continue".


Now the Hadoop services will start to run for the first time on the cluster.


After the “First Run Command” has successfully completed, the Cloudera Manager Admin Console will open up for administration activities like configuring, managing and monitoring CDH.

Now the installation of multi-node Cloudera cluster is complete.

Related Posts: